


AKH Online, Inc
Accomplished Internauts
Other Sites in the News
- February 13, 2026
- Mobile connections share in the U.S. by generation 2019-2030 - Statista
Setting up Eclipse for ColdFusion development

When it comes time to set up a development IDE (Integrated Development Environment), these are the steps I follow. This post is specific to the ColdFusion as the development language and Subversion (SVN) as the upload method.
It assumes that the production sequence generally goes like this:
- Each developer works against a server installed on their own computer. A shared development database is provided at a remote location. (Some will prefer to host a database on their own computer as well. This has benefits - one can continue development even without a network; which is nice for application demo as well, because client buildings might have insane network security. The downside is the developer must work with a totally fictitious set of data, due to the danger in letting real business data sit outside your security)
- Developers commit their code to the SVN repository when each assignment is completed. A central staging server will update from the repository at each development release, which is usually every morning or evening. This is where the combined work of all developers is tested - preferably by an experienced QA entity. It's also where the business user can review the system before it is released to production. Bugs & revisions are entered to an issue management system, and code changes are committed back to the repository.
- Once a repository revision is approved, the production server will update from the repository and the new release is 'live'. Production releases are generally done every two weeks or so.
Steps to a starting setup:
Note which version of Eclipse you'll need: The supported version for CFEclipse is listed here. If you plan to buy ColdFusion Builder, check out Adobe's System Requirements. FYI - I used Eclipse version 3.5 last time I followed these instructions.
Download some stuff: While on the Adobe site, download the ColdFusion server (get the same version as your live production server), and optionally download ColdFusion Builder as well. NOTE: You only need the Eclipse plug-in version, you do not need the standalone application. I enjoy some of the extra features that are bundled with CF Builder. It also has Aptana's sweet css editor and far superior RDS, FTP and SFTP tools. You can install the timed demo version while you decide to buy...
ColdFusion server: Run the server installer now. (Set aside your CF Builder download for later.) Elect the "Developers Edition" options whenever you are asked. While the setup is running, this is a good time to get the connection info you'll need for the development database (url, username, password, etc). After the setup has completed, you should wind up at the CF Administrator web page. Use this opportunity to set up a 'datasource' to that development database.
Eclipse: Go to the Eclipse Download Page and look for the version you need. You may need to scan previous version links at the bottom right of the page. You can either install the Classic package, or one which has extra web tools (WTP) like a PHP or JavaScript/Web version. Download the zip and expand the files to a directory on your system drive like C:\eclipse. Launch the eclipse executable and insure it runs. Click Help | Check for Updates and follow the steps to see if you need any new files.
ColdFusion IDE: Install the CFEclipse plug-in by following the instructions here. Restart Eclipse again. Close the splash screen - if there is one - to reveal the workspace. Alt-click any PHP & Java perspective icons (upper right) to close them. Use the Window menu to find and open the CFEclipse perspective instead. Use Window | Preferences to set your personal options (for example, I like to go to General | Editors | Text Editors and insure "show line numbers" is checked). Close Eclipse and install the ColdFusion Builder you downloaded earlier, if you wish.
Subversion: So this is all good so far, but you need some version control to commit your code! If you have a Windows machine, you should install TortoiseSVN so you can work directly with the repository (browse content, read logs, etc) without learning a whole book on svn command line syntax. For daily development, install the Eclipse plug-in Subclipse using these instructions. This way you can Update and Commit your code from within the IDE.
Check out your first project:
Now that the Subclipse plug-in is installed and your Eclipse has restarted, use the Window menu to open the SVN Repository perspective. Find and alt-click in the SVN Repositories view and elect to add a New Repository Location. Provide the URL that you got from your SVN server administrator. Once you can authenticate and see the entry on the list, alt-click on it and elect to Checkout.
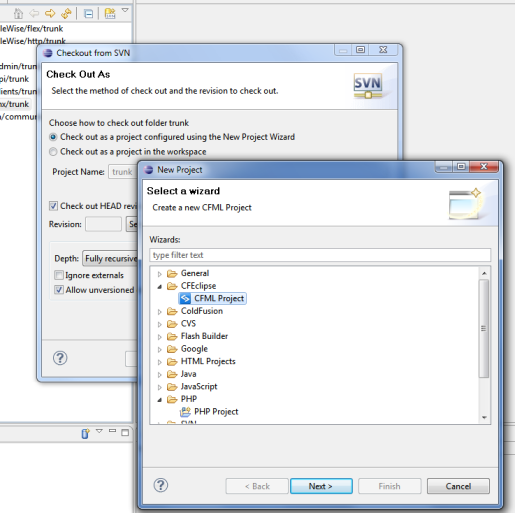
Check the option to Check out as a project configured using the New Project Wizard, and leave all the other options as you found them. Click Finish and the Project Wizard will take over. Elect CFEclipse | CFML Project from the list of project wizards. Next you'll specify your working name for the project and where the files will go.
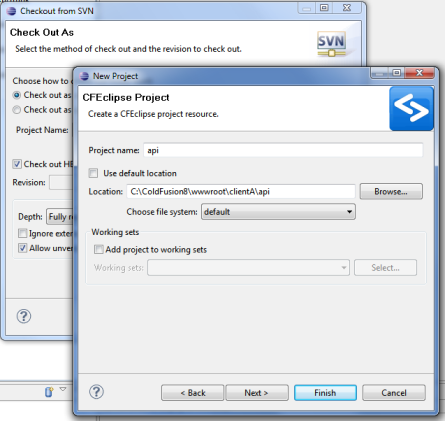
Your files need to be located in a directory where the ColdFusion works. For a standard Windows installation, this would be under C:\ColdFusionN\wwwroot, where N is the version number. Because I develop for more than one project at a time, I throw another directory level in there - so that my local server can deal out more than a single site.
Click Finish, and Eclipse will change to the CFEclipse perspective and start to populate your project directory with all the files from the repository. You should never really need to look at the SVN Repository view for this project again: from now on you will work using the Navigator view.
You are perhaps ready to start development. I say "perhaps", because occasionally these projects will include some configuration files which are outside the repository. This is because the settings within them are specific to your own development environment (like the path you used for the "Location" in the screenshot above. Your own app needs to know it but - I mean - how would anybody else know that?). So check with the project manager to see if you need to provide a file like that.
Editing Content:
Before you start work on a file, it's always a good idea to be sure you have the latest version. Sure, the little SVN state icons next to each file can help, but sometimes they lag behind when networks are involved. So alt-click and elect Team | Update to HEAD before you open and work on it.
Note that SVN sets your file state icons by comparing contents, not by modified dates. So you can temporarily add some debugging code to a file, and then undo it back to it's original state. Subversion will understand and remove the changed icon.
Saving Content:
When you have saved your finished working file, just alt-click on it and elect Team | Commit to send it back to the repository. Please add a short comment, either summarizing what you did, or simply cite the issue number you were fixing. Note that your change just goes into the repository. It won't appear on the Staging server until the next development release (usually tonight or tomorrow), when everybody's changes get tested together.
Brand New Content:
If you have something new to add to the project, simply create or paste the directory or file into the Navigator view. Then alt-click on it and elect Team | Add to Version Control first. Now you can use Team | Commit just like you do above.
To See your Local Site:
By default, your local ColdFusion server is set so you can browse it at: http://127.0.0.1:8500/ When you use this URL, you are looking at the web root directory of your server installation (the Windows default is C:\ColdFusionN\wwwroot, where N is the version number). If you placed subdirectories below this root (suggested if you plan to work on more than one project or site at a time), you'll need to include these in your browser path in order to see where your application starts.
Database Plug-in?
Many developers already have a database management tool they are fond of, and are happy flipping back and forth between it and Eclipse. But this blog post is really just a diary for me; and I like to throw the SQL Explorer plug-in on my Eclipse as well. It'll connect to any JDBC driven SQL database and give me most of the tools I need for schema, query and procedure development. But to keep things free and open, you need to fetch and install the JDBC drivers yourself for many products like MS SQL Server.